Hey there, we are back to upgrade your beginner level. Yes, Today we are going to talk about relative layout in android. So lets move ahead and have clear understanding about it.
For example this is a relative layout as parent view.
Now, we will create a child view inside this parent view.
As you can see that there is a child view on which we are going to change it's attribute.
Have a look on some attributes and there characteristics that what they does.
So let's get started with the attribute one.
1. android:layout_centerHorizontal
See the result of this attribute. We applied it on our child view.
As you can see that if we do android:layout_centerHorizontal = true, child view is now horizontally centered.
2. android:layout_centerVertical
This attribute hangs child view in center, vertically. See the result of this attribute. We applied it on our child view.
3. android:layout_centerInParent
You have already seen previous attributes and knows that how they can be used. Same as we will use android:layout_centerInParent. after appling this, the result will be like this.
As you can see that by using android:layout_centerInParent we can take our child view in center, horizontally and vertically both.
Let's move ahead and take a look on some more attributes.
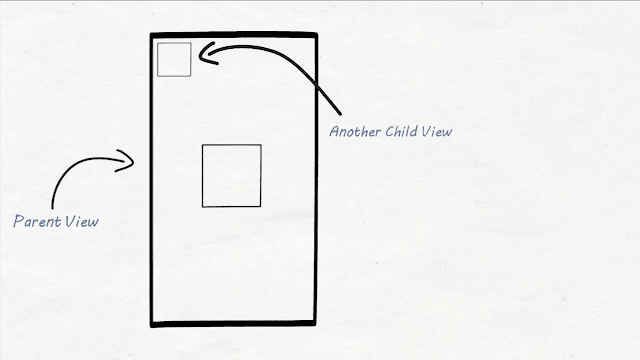
Before moving further let's make another child view in that same parent view.
Give them ids, id:A and id:B.
After giving them ids we are going to apply some more attributes.
1. android:layout_above
See the result of this attribute. We applied it on our child view(id:B).
You can see that child view containing id:B is above another child view id:A.
2. android:layout_below
By applying android:layout_below on child view (id:B), we can set this, below another child view (id:A). See the result of this attribute. We applied it on our child view(id:B).
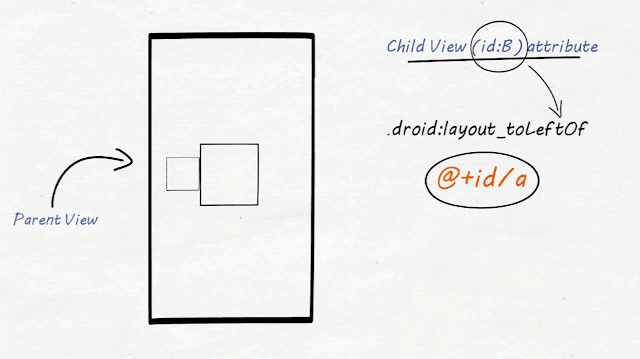
3. android:layout_toLeftOf
By applying android:layout_toLeftOf on child view (id:B), we can set this to the left side of another child view (id:A). See the result of this attribute. We applied it on our child view(id:B).
4. android:layout_toRightOf
By applying android:layout_toRightOf on child view (id:B), we can set this to the right side of another child view (id:A). See the result of this attribute. We applied it on our child view(id:B).
Sounds Great !!! You learnt almost 80% of this tutorial. Before moving forward, Have you subscribed our YouTube Channel ? It helps us to make more informative blogs and videos for you. Please click on subscribe button.
And also don't forget to bookmark us (Ctrl + D).
Okay, so there are some more interesting attributes.
1. android:layout_alignParentTop
android:layout_alignParentTop takes child view at the top position of parent view. We are also using android:layout_centerInParent for better understanding.
2. android:layout_alignParentBottom
android:layout_alignParentBottom takes child view at the bottom position of parent view.
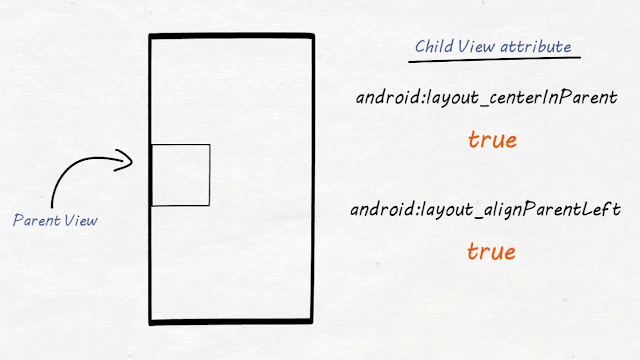
3. android:layout_alignParentLeft
android:layout_alignParentLeft takes child view at the left side of parent view.
4. android:layout_alignParentRight
android:layout_alignParentRight takes child view at the right side of parent view.
That's it for today. Do practice as described in video at the top of this blog. And if you face any issues then clear them by commenting below.
What is Relative Layout ?
A view group that displays child view in relative positions.
The answer you read above is so common. But have you ever get it ? what does it means actually ? Yes, you still have some confusion about relativity. So let's understand it in a layman way.For example this is a relative layout as parent view.
 |
| Relative Layout as Parent View |
Now, we will create a child view inside this parent view.
 |
| Child View in Parent View |
As you can see that there is a child view on which we are going to change it's attribute.
Have a look on some attributes and there characteristics that what they does.
| Attributes | What it does ? |
|---|---|
| android:layout_centerHorizontal | This attribute will take our child view in center, horizontally. |
| android:layout_centerVertical | This attribute will take our child view in center, vertically. |
| android:layout_centerInParent | This attribute will take our child view in center, horizontally and vertically both. |
1. android:layout_centerHorizontal
See the result of this attribute. We applied it on our child view.
 |
| android:layout_centerHorizontal |
As you can see that if we do android:layout_centerHorizontal = true, child view is now horizontally centered.
2. android:layout_centerVertical
This attribute hangs child view in center, vertically. See the result of this attribute. We applied it on our child view.
 |
| android:layout_centerVertical |
3. android:layout_centerInParent
You have already seen previous attributes and knows that how they can be used. Same as we will use android:layout_centerInParent. after appling this, the result will be like this.
 |
| android:layout_centerInParent |
As you can see that by using android:layout_centerInParent we can take our child view in center, horizontally and vertically both.
Let's move ahead and take a look on some more attributes.
Before moving further let's make another child view in that same parent view.
 |
| Another Child View in Parent View |
Give them ids, id:A and id:B.
 |
| Assigned ids to both child views |
After giving them ids we are going to apply some more attributes.
| Attributes | What it does ? |
|---|---|
| android:layout_above | This attribute will take child view(id:B) above another child view(id:A). |
| android:layout_below | This attribute will take child view(id:B) below another child view(id:A). |
| android:layout_toLeftOf | This attribute will take child view(id:B) to the left side of another child view(id:A). |
| android:layout_toRightOf | This attribute will take child view(id:B) to the right side of another child view(id:A). |
1. android:layout_above
See the result of this attribute. We applied it on our child view(id:B).
 |
| android:layout_above |
You can see that child view containing id:B is above another child view id:A.
2. android:layout_below
By applying android:layout_below on child view (id:B), we can set this, below another child view (id:A). See the result of this attribute. We applied it on our child view(id:B).
 |
| android:layout_below |
3. android:layout_toLeftOf
By applying android:layout_toLeftOf on child view (id:B), we can set this to the left side of another child view (id:A). See the result of this attribute. We applied it on our child view(id:B).
 |
| android:layout_toLeftOf |
4. android:layout_toRightOf
By applying android:layout_toRightOf on child view (id:B), we can set this to the right side of another child view (id:A). See the result of this attribute. We applied it on our child view(id:B).
 |
| android:layout_toRightOf |
Sounds Great !!! You learnt almost 80% of this tutorial. Before moving forward, Have you subscribed our YouTube Channel ? It helps us to make more informative blogs and videos for you. Please click on subscribe button.
And also don't forget to bookmark us (Ctrl + D).
Okay, so there are some more interesting attributes.
| Attributes | What it does ? |
|---|---|
| android:layout_alignParentTop | This attribute takes child view at the top position of parent view. |
| android:layout_alignParentBottom | This attribute takes child view at the bottom position of parent view. |
| android:layout_alignParentLeft | This attribute takes child view at the left side of parent view. |
| android:layout_alignParentRight | This attribute takes child view at the right side of parent view. |
1. android:layout_alignParentTop
android:layout_alignParentTop takes child view at the top position of parent view. We are also using android:layout_centerInParent for better understanding.
 |
| android:layout_alignParentTop |
2. android:layout_alignParentBottom
android:layout_alignParentBottom takes child view at the bottom position of parent view.
 |
| android:layout_alignParentBottom |
3. android:layout_alignParentLeft
android:layout_alignParentLeft takes child view at the left side of parent view.
 |
| android:layout_alignParentLeft |
4. android:layout_alignParentRight
android:layout_alignParentRight takes child view at the right side of parent view.
 |
| android:layout_alignParentRight |


Really clear, thank you.
ReplyDeleteHey there, it's our pleasure and thanks for commenting.
Delete(y) keep up the good work
ReplyDeleteThanks Mudasir :D
Deletemine not working i dont know why, still the same shit always it center and have margin but i didnt put margin on it.. can yu help me...
ReplyDeleteawesome graphics loved it.....
ReplyDeleteIt's late finding this act. At least, it's a thing to be familiar with that there are such events exist. I agree with your Blog and I will be back to inspect it more in the future so please keep up your act.
ReplyDeletePMP Certification - 360DigiTMG
PMP Course - 360DigiTMG
PMP Training - 360DigiTMG
PMP Training in Malaysia - 360DigiTMG
PMP Course in Malaysia - 360DigiTMG
so happy to find good place to many here in the post, the writing is just great, thanks for the post.data science course
ReplyDeleteReally nice and interesting post. I was looking for this kind of information and enjoyed reading this one. Keep posting.
ReplyDeleteI wanted to thank you for this great read!! I definitely enjoying every little bit of it I have you bookmarked to check out new stuff you post.
ReplyDeleteservicenow training and placement in hyderabad
It is truly a well-researched content and excellent wording. I got so engaged in this material that I couldn't wait reading. I am impressed with your work and skill. Thanks.
ReplyDeleteservicenow training and placement in hyderabad
Hi, Thanks for sharing nice information...
ReplyDeleteBest Audit Firms in India
I am impressed by the information that you have on this blog. It shows how well you understand this subject.
ReplyDeletefull stack developer course with placement
Casino de San Diego - MapyRO
ReplyDeleteCasino 상주 출장안마 de San Diego 김포 출장안마 is a 3-minute drive from the 평택 출장마사지 Cosmopolitan of Las 김포 출장안마 Vegas. casino and entertainment located in the center 성남 출장마사지 of the city.