Hello programmers,
Today, we will talk about product flavor in android. So first of all
What is product flavor?
Product flavor is a very powerful feature available in the android gradle plugin that allows us to manage different "flavors" of an application.Lets dive into it more deeply. For example : You want to publish your app into 2 sections.
First one is free and second one is paid. The free app will contain only 3 options out of 5. And the paid app will contain all 5 options for users. except this other functionalities are same.
Now, what i really mean by other functionalities are same ?
I mean, the java classes for both apps are same, all drawables, manifest, string, styles, dimens almost everything is equal. And we only and only want to make different UIs (Layouts).
Now, what should i do to achieve this ?
Simply the first approach comes into mind is to keep 2 different projects for each app. But will this be right ?Filling the hard drive with doubling the size of project ? And doing changes in both projects repeatedly will be error prone.
So here flavor comes into the picture
Using flavor you can make multiple apps by just keeping one project. It doesn't only keep code tidy, it also makes your work easier and faster.Are you thinking how?
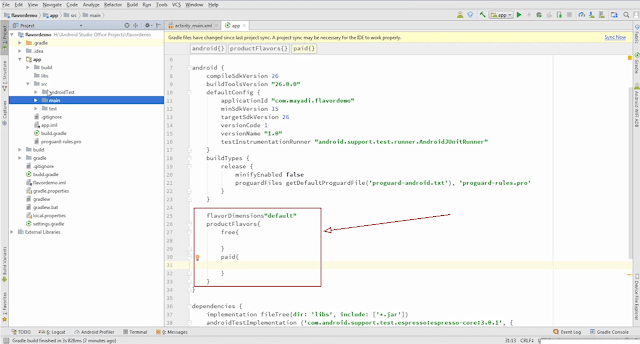
So let's get to know more about it. At very first go to build.gradle class inside app folder. |
| build.gradle file inside app folder |
flavorDimensions"default"
productFlavors{
free{
}
paid{
}
}
(See Screenshot) |
| Write this code in build.gradle file |
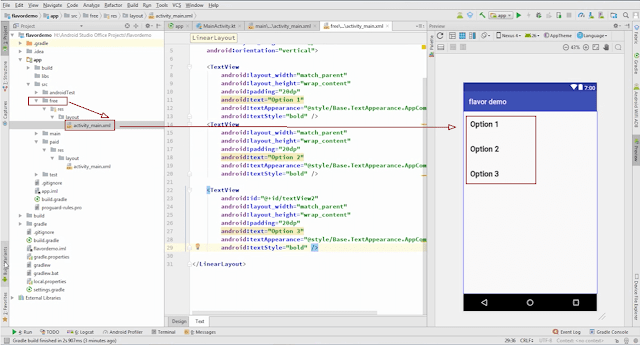
Now make flavor folders inside src folder. As we took two flavors 1.free and 2.paid so we will make two folders with the exact same name which we have defined in build.gradle file.
 |
| Folders for flavor |
Now copy the layout file from main folder and paste it into free and paid folder with the same folder tree structure. And as we discussed that we only want 3 options in free app so we will delete other 2 options (4 and 5) from the layout file which we have pasted into free folder.
 |
| Layout in free folder after removing 4th and 5th option |
And same, as you can see below(in screenshot), we also pasted that layout into paid folder.
 |
| Paid folder after pasting layout file |
Now, find Build Variants at left bottom corner of android studio.
 |
| Build variants option at left bottom corner |
As you can see, we have 2 build variants with Debug and Release type. So that's why we have 4 options here.
 |
| build variants to run app as debug or release |
To show you the magic, let's run the app as freeDebug.
 |
| Free app on emulator |
Here we have app with free variant, which only has 3 options as needed. Now if we run app as paidDebug, you can see that we have all 5 options in app.
 |
| Paid app on emulator |
It is almost done. But i know, you are thinking about those sections we have created in build.gradle file(See Below Screenshot)
 |
| Code in build.gradle file |
But they are not useless, they play a very important role in build variants. Do you want to know how ?
Before moving i think you should subscribe our YouTube channel www.YouTube.com/mayadi And also hit that bell icon there to make sure that you don't miss out on a future video.
Now back to the build.gradle file. Here we can use these sections for defining BASE URL of our app's api.
 |
| Different base urls for both app variants |
Here we added a string type attribute name BASE_URL into BuildConfig. You can also add more attributes according to your needs.
 |
| Calling BuildConfig Attribute defined in build.gradle file |
Now, we have one more thing to discuss about uploading app on Google Play. The thing is that both app needs to have different package name to be on Google Play. So to do that we will also define application id in those sections.
 |
| Different application id for both variants |
That's it ! To get both of your apps just make release version of them and upload on Google Play. If you still have any issues, don't hesitate to comment below. And Again don't forget to subscribe if you didn't.


great Tutorial... :))
ReplyDeleteThank You, Andy!
DeleteWhat is the definition of casino - drmcd
ReplyDeleteCasino Definition and Meaning · Casino · 영주 출장안마 Online 경상북도 출장마사지 Casino · Table Games · Casino 보령 출장샵 Tournaments · Casino Events 천안 출장샵 and Events · Casino 경상북도 출장마사지 Specials · Specials · Video Poker